Sign Up a Client
Step-by-step Instructions
Log on to 2Shakes. The first time you log on you will go to the Profile page.
After your profile is set up, and on subsequent logons, you will automatically go to the Dashboard.
From the top navigation, choose Start > Sign Up to start a client Sign Up process. This creates an Agreement and optionally captures Authority to Act and does AML Customer Due Diligence.
Step-by-step Instructions
The fist step is to identify the entities you are signing up. You can search for entities on the Companies office or chose to manually type in client details. 2Shakes will pull through directors and ask if they should be added to the sign up list (as a signatory for the entity or as an individual). You can search for additional entities or manually add other entities until you have a full list for your client. The IRD field should also be captured if known.
After you have selected all the entities you should determine which address to use, then proceed to the next screen.
You can find out more information about what to do If your client is a:
Deceased estate, (or unable to sign the agreement themselves for other reasons)
Services & Fees
What services will you provide to the client? Select the tick box to indicate which services you will provide for your client. If you need to add other services you can do this on the Profile page.
Fees The template fee text from the Profile page will display here. You can overtype it to suit the fees you agree with your client.
Terms & Conditions These are the template terms and conditions from your Profile page. The drop down box allows you to choose between standard and alternative Term & Conditions. You can overtype the terms and conditions to suit what you agree with your client.
What attachments should be sent to the Client? The attachments that you loaded from your Profile page show here. The default is to send them all, so deselect any you DO NOT want to be included.
Authorities Screen
The authorities you set up in the Profile page will show here. Select those that apply or deselect those that do not apply for your client.
Parties and Sign
The Parties from the sign up list will show. You need to decide who will sign up the agreement and how they will sign.
De-select directors if they do not need to sign the agreement by un-selecting the tick box next to the directors name. Note: For companies all the directors details will populated onto the form, but can be de-selected.
Add signatories button allows you to add other people to sign the agreement. Note only directors grant authority requests to companies office. Only persons in a position of authority for a company (Finance Manager or equivalent senior management position) can grant authority request for ACC and IR.
Email capture the email address that the signed agreement will be sent to
Sign Here and Now via SMS text sends a 6 digit confirmation code to your clients Mobile Phone
Sign Later via Email sends an email to your client with a link that takes them to a web page that they can sign
Save Draft saves the current agreement on your Dashboard page
Download Draft as PDF opens a draft PDF of the agreement
Review Email lets you review and amend the email that will be sent to you client after they sign the Agreement.
Proceed to Signing moves to the Review & Signing screen. It will trigger a confirmation code to the clients mobile if they are signing in person or an URL link to the clients email (if signing later).
Review and Sign Agreement
Select the name of the person signing to see their status at the bottom of the screen.
Identity: The client can enter details of their photo identity here.
Accept Bookkeeping agreement and confirm authorities: This tickbox must be selected to sign the agreement.
Signature: Type Signature The client can type in their name and a stylised font will be used
Signature: Upload Scanned Signature The client can upload an image (less than 500k) of their signature
Signature: Sign on Screen The client can use their touch screen or mouse to sign
What's Next?
Once all parties have signed (and and Signatory ID Verifications have been done) the following happens:
You are emailed each time a person signs the agreement.
A copy of the signed agreement is emailed to each client who signed, once all have signed.
Authority requests are sent in to each authourising organsation, (2Shakes will select one director as the authorising party).
The agreement shows with an Authority Submitted status on the Dashboard page.
Videos
Watch this video to see the whole end to end sign up process for 2Shakes.
This shorter video just focuses on the Sign Up List.
Watch this video to see how the sign up process works after you have completed your sign up list on 2Shakes.
Renew Agreement
After you have signed up client up with 2Shakes at a later date you might find it useful to renew or update the agreement. The 2Shakes renewal option makes renewal easy. We allow you to recreate the original 2Shakes agreement, change any detaills, and then resend the agreement to you client for signing.
Why renew an agreement?
To re-confirm with your clients agreement that you are still engaged to work for them.
To meet the requirements of Professional bodies you are a member of that require an annual compliance signup.
If your firm has is changing the fees it charge, or updating Ts and Cs.
Steps to renew an agreement
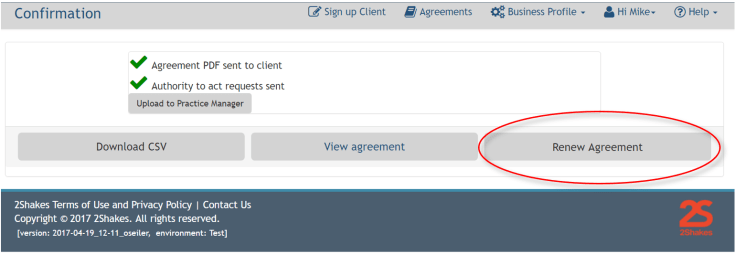
From the Agreements screen select the agreement you want to renew by click on the client name. This will take you to the Agreement Confirmation page. To renew the agreement click on the Renew Agreement button,
When you click on Renew Agreement, a client signup will be launched with:
The same client details as before (editable)
IRD Authority selected in case wording needs to be updated, but ACC and Companies Office are deselected (so we don’t resend info). To add or change an authority, simply select it.
The same Fees as the previous agreement (editable)
Your current Terms and Conditions in your profile.
See our Renew Agreement page for more.
More Help
Didn’t find what you need here? You can find lots more help on our main Support Page.
Or you can contact us or email us at support@2shakes.co.nz and we can help you with what you need to know.
Thanks very much,
The 2Shakes Team